✨Aroace Door Tag✨


✨Aroace Door Tag✨
‘Name' looks really terrible, but couldn’t just put my real name here-
In hindsight, Sample might have been better. Anyway, if you want to get something like that yourself and are struggling with the letters, my dms are open — or asks even, if you’re feeling bold-
And of course, studio closeups bellow the cut
With, and without 'name' (M is really a terrible letter because of how wide it is, though now that I’m writing this, I know how I could have done it better. Well, too late.)


More Posts from Antrylis and Others


✨Custom bionicle (again) !✨
Two more from my Ru-Fahi series !
Details and rambling below !
Jaller Ru-Fahi


…Because I couldn’t not include him. Realistically, all Toa Mahri a good to some extent, but this is peak Toa material right here. One of the first I acquired, one of the best looking ones, too. The base body is practically the same as the original, with some twists, but I mostly made him thicker and upgraded his sword, which is better with a guard and a proper handle. Well, that, and the Hannah, obviously. Sure, the original one was cute, but here me out :


Look at it, and behold ! It might be slightly bigger than the original, have only four legs, and need a larger chain (which I found just earlier in a box of misc Hero Factory pieces, and is better than a basic Lego chain), but doesn’t it look very cute and wholesome and dangerous ? Also, I gave it actual joints, because it deserves it, and removed the Kordak blaster because it didn’t need it anymore. I really love making arthropods with bionicle (I have more for later~).
Pohatu Ru-Fahi


Definitely looks awesome. The original is Pohatu Phantoka from the Rockoh T3 set (because I have one and a half of this set). It is the coolest version of Pohatu (because orange>brown, obviously). Lot of modifications on that one, from the custom jet pack to the arms and the legs. The arc pieces for the front arms are more or less of placeholders because I was niece a good piece to make the arms larger, but it turned out alright. The blades are also stolen from the half Rockoh, and the piece underneath, if anyone recognises it, is from Pohatu Nuva, because it’s a neat reference. And the tube is somehow remaining in the Kanohi, despot the fact that there is not any proper connection for it tand hold onto.

Also, can we talk about this leg ? If you ignore how incredibly illegal this whole piece is (ball joint stuck by the light grey part and small black and grey piece not completely connected to the rest), I think that’s the best shape I managed to get so far, and it reflects nicely what I have envisioned (Pohatu being able to run/jump easily because of the shape). And, it had the added advantage of fitting perfectly with the orange piece above when the knee bends.
Last but not least, I also have started a potential candidate for Toa of air, despite a lack of proper Kanohi, even with my extensive collection. My first candidate would have been Lewa Phantoka from the Axalara T9, but this one has a special place in my heart, so won’t be touching it and it will proudly remain in his shelf (along with the untouched Pohatu). So, maybe another of this series soon ! But probably not. And if I miss posting custom bionicle too much, I have a (complete) collection of entirely custom Toa, but I’m afraid they won’t fit in my studio (they’re big, too big).

✨Tragon !✨
Trans...dragon..It's funny, right ?- Also, I know it's a wyvern...Dragon sounds better...
It's pride month, so it was the perfect occasion to finally make a dragon, yay ! It's also my first time making something akin to a dragon (technically the second time,, but the first one is truly horrible), and even if the proportion are still a bit out of place, it could have been worse. It's also my first time doing custom wings, but I'll talk about that in more details beneath :}
Also, it needs a name ! I’m really bad with names, but I would gladly take suggestions ! (And here is an alt picture, in its natural habitat-)

Anyways, details/closeups under the cut !
None of these picture below are edited, because it's exam period- Enjoy the green backgrounds :}

I have to say, before any other comment, that I made the body way to heavy for the two poor sockets of the legs. The position above is the only one where it's actually standing upright. Also, my stock of pink and rightly-shaded blue was much smaller than originally anticipated, so I would have done a bunch of tings differently, if it wasn't for that. Still, I was lucky to have that many curved blue pieces for the top part. Well, all of the ones with purple diamonds on them have been forcefully taken from a small Elves dragon, but it was worth it (I also really enjoy the purple here, it contrasts nicely).
All of the joints are mixel socket joints, except for the knees, which are just hinges. It gives a lot of movements, from the tail to the jaw. Even if these are limited, it gives it a wide range of positions (even if, realistically, it won’t change it much from the one I gave it). Still, it can sit ! (Including small trans flag)

The pointy scales on the back are some of the only elements which aren’t directly attacked to the body : one 2*2 plate holds them down, and a modified 2*1 under the plates keeps it from sliding in any other direction, so even with little connections, it doesn’t budge. I really liked these angular pieces. To keep them from being too repetitive, they are only connected to each other by one stud, with a small angle, which gives them a slightly "round" effect.

The tail here is not really complicated, it's just a bunch of socket joints linked together with curved tiles on top (one of the sticker is backward, and it's unnerving, but it's not my fault and I can't risk changing it...), with white arch pieces underneath. Not sure of why I added these in the first place, but it looks cool. And of course, the end of the tail is a big heart, because it simply fits the vibe, doesn't it?
Of course, I can't forget what is the most important, and what makes this creature as cute as it is ! (It is cute, and if that is the hill I have to die on, I will.)


The green background doesn't show it well, but the flame offers a good contrats with the rest of the head, and brings the eyes there first (instead of all the mistakes present). Because there are a bunch of these.
I spent nearly as long on the head as all the other body parts cumulated (except for the wings), because making something detailed yet small enough to be a good head is tough. I actually started from the top (for the piece with the sticker, more exactly), instead of the bottom, like I usually do, in order to get an idea of scale (because I already knew I wanted the jaw to move, and for that I needed to see how big it would be). Then, I did the back to quickly have a neck connection point, to see if it would fit. Because the neck is larger under the connection sockets, the socket of the head is actually pretty high up, but the colours are practically aligned so it works well.
Then, the next thing was the eyes and the spikes. The spikes took me a hile to figure out, because without the rest of the head, they looked kinda dumb, but it does bring the head together when everything is in place. Then the eyes : on the small dragon I took apart, there were these blue tooth pieces which I used to get some texture above them, so that they don't look flat, and then, I connected them to the center connectors of a 2*4 plates. That works well in placement, but I ran into the issue of what would be around. If I didn't do anything, there would be two gaps, which would look terrible. Instead, I stuck two 1*4 tiles in these gaps, and since the tooth pieces are around either side, they don't move - well, not much, they still produce a shaking sound when I'm moving the head.
Then under these plates, I directly have 1*4 pink bricks, which stick out behind the head. At first, it was a problem, and I had nothing else to replace them; but they actually restrict and hold the neck, so that even if the head is technically a bit too heavy, it remains in place.
The actual teeth are modified 2*1 plates, four at the top and four at the bottom. To keep them with such a small gap (and to attach them to either sides of the jaw) I have use modified 1*1 plates with a ring. There is a single one at the bottom, and then underneath a few cut 2*1 and 2*2 curved tiles to make the jaw triangular; and two on top, one which connects it to the head and one with holds the snout (which is using a cheese piece and another one of the blue tooth).
So, custom wings ! It isn't actually complicated, if only a bit tedious. Here below is all that I needed to make them :

As you can see, it's not much. Most important, of course, is a good, solid sheet of paper, and a cutter (precision cutter is better, in my opinion, but anything works). To make things easy (or if, like me, you don't know how to draw properly), you can take a basic lego wing, and trace the outline and where the holes go. I would advise only doing a single, blank one, at first. Once you have your proto-wing, you can start to make the actual frame it will be attached on. I chose to use bricks above it to act as claws, but you can use socket joints, like in most sets. The advantage of using plates is that the overall look is better, but if you want overhangs like I did, you have to get the holes really close to the edge of the wing.
Once you have your frame, trace where the holes would go on it ! (if you used a wing model, it might be easier, but it could also not fit, which is why you make a prototype first). To make holes just the right size, I would advise first cutting squares (easier than circles) at just the right size, then scratching the edges with the blade of the cutter. Once it looks good, try to fit an axle inside. If it just about fits, and can rotate, it's good ! Otherwise, just remove it and scratch again.
When that's done, test if it can correctly fit on your frame. Once that's done, you can either make two wings with that pattern, or simply make another copy. I personally made two new from my first prototype because it took me a while to figure out exactly how to place the holes.
Finally, once you got two wings, you can finally add whatever you want on them (easier when they're not actually on the frame, although that should've been obvious), and you're done :}

I went for a really basic thing, but technically, any shape is possible. I'll likely use it again someday, because it's quite fun !
And of course, the bonus picture, since you’re here ! I like the symbolic of this (also don’t pay attention to the tentacles).

I actually really wanted to get rid of this castle (which was gifted, not exactly desired, although I must admit it’s really well designed), and well. Now, it’s gone, and in its place lies the dragon…and my horrendous crab, too.


✨Bile titan✨
Or the fact that I don’t have access to real legos anymore will not stop me from making mocs (more on that under the cut).
I’ve really enjoyed Helldivers and I’ve been meaning to make one of those for some time, now. And I think it turned out quite alright, all things considered. It’s a shame this happened he will never physically be on my shelf, but it’s better than nothing~
Anyway, details and rumbling under the cut, as always.
Here are more viewpoints :


Most of the parts here are articulated, although the head barely moved, and the second joint of each leg is fixed, because making it movable with this size would have been a hassle.
Though, it still has a lot of posability (even the small pincers move !).
The bottom is not really detailed, because it won’t be seen much, but I’ve still added a few things, including the protuberant bile sack underneath, because it gave me a great excuse to use an alien egg, which used to be an incredible piece.
Now though, let’s deal with what this isn’t : real.
It’s fully made with Bricklink’s Studio, which is a free computer software giving one access to pretty much all the bricks you can think of, without limitations on colour (this is great, because 99% of the pieces I use here do not exist in the colour scheme I used). It also comes with a part designer, to create custom prints and/or bricks. There aren’t any prints here, but I am working on something else which uses them.
The only down part is that I can’t use any illegal technic, which is a shame since I usually rely on those a lot (check my post about the Citadel and you’ll understand~). It does make sense, though, and custom rotations are allowed, so it’s not all bad.
Also, if you’ve read until there, congrats ! I do have one more thing to say, though. Given that I know have access to an infinite amount of bricks, I can take requests, if you ever have an idea you’d want to see realised (albeit note it might take a while !).

Following in my pride flag series :
✨Ace pride flag✨
(Previous work here !)

✨Tree ! ✨
So I found another technic. And it makes for great (albeit round) trees.
Anyway, some rambling about that below.
Another angle. It's not needed; but oh well.

It's very simple, I'll admit that. Then again, I don't do purely organic MOCs very often, the last one was probably my Camp Site, and it wasn't the main focus at the time, but I'm trying.
Anyway, if you actually decided to read that, you're probably seeking whatever technic I used to make that, not the random rambling. So here it is :

To sum it up : core piece is a modified 1x1 brick, surrounded on all sides by two flower stems (I've used the bar ones, the stud variants work too). Then flowers and leaves. To give some varied shapes, you can get some leaves upside down (cyan ones on the image), and you can also get rid of flowers by using a piece on the other side of the leaf (any piece works as long as it has a small bar connection), like the blue one on the right. Of course, same trick as before to give some shapes. It has some limitations, but I still think it's relatively good. If you like sphere, that it, hence why using a couple of them is better.
Also, I feel like, since I'm yapping about organic MOCs, I have to present my very first one :

That's ugly. But at least, you can technically tell it's a flower.
It's fragile and it's not interesting, though one funny thing is that, in order to keep it from collapsing under its own weight, I've had to add small iron bars (think unfolded paper clips) in the stem, which is actually really sturdy, while allowing for curvy shapes. Probably the only thing worth keeping from that thing.
Anyway, this whole tree thing was an accidental tangent from an actual, cool(?) MOC I was working on, which might actually be posted next week. Or maybe not, who knows really ?

✨Custom stone Toa !✨
Yay ! It’s so big there are shadows on the top of my shelf studio.
Also, we’re already at 4/6 for these, isn’t that crazy ? I think it is.
Details below the cut !
Front/back :


I had some kind of vision with this one. As I started messaging by around with pieces, my brain said 'scorpion'. So mandibles and tail (and that’s about where the scorpion resemblance ends). Of course, I had to keep an element of Pohatu, so his foot is the end of the tail (which is quite wobbly-).
I tried to vary shapes from what I had previously, so I made some big shoulder parts, which look okay and offer some interesting movements, but are pretty weird if you think about it too hard.
The body-legs connection is a bit thin, but it still kind of work with the overall design, so I left it that way (that, and I am running out of brown pieces…)
The weapon are simple sticks with harpoons (?), nothing too complicated, though it was meant to be a single stick originally, it was waaaay to long for the photos. Also, has anyone any idea of which set these harpoons (still '?') come from ? I can’t seem to find it, apparently.
Side shot :

As you may see, I’ve made all the limbs quite thick, because it fitted what I had in mind well, and I messed with a bunch of old pieces for the legs (mostly the sand pieces). There is also have a Bohrok’s body for each foot, because these work surprisingly well, and the middle segment of the leg is backward to give some hypothetical springiness to the legs. Also, Rahkshi feet as armor, that’s always a good recipe.
Head shot ! (Ah, that’s funny.)

Look at how dark that shot is ! If only I had taller shelves…
Anyway, the head is a mix of Rahkshi and Vahki heads, which mix well (there is also a gear underneath. Don’t ask me why. It just exists.)
All of that makes it looks like a V2 Rahkshi (when there is a single stick) which was pretty much on purpose.
On a side note, I’m pretty much done with my big project (which is good, I’m meant to expose it this weekend. Whoops, that’s suddenly very close.)
And, yes, I finally added the #moc, thank you for reminding me every time, I’ll add it from now on :}

✨Cargo starship ! ✨
A 'little' part of a larger idea I’m developing~
Right under the cut, closeups and some explanations !
Tiny container carrier :


It’s small, it’s adorable, and I still haven’t figured to how the container will be properly held, so the entire system underneath is improvised and will be subject to changes, hopefully.
Cargo closeups :


Lot more to say about this ! Firstly, that the support I gave it is very unstable, but that should be fixed later.
I was playing around with the idea of a small ship with six rows of container in an hexagon, and ended using a combination of 3-branched crossed around a technic axe to do that. Then, one thing following an other, I needed up with two sections connected by one of these large rings like you see in some movies for gravitational purposes. The entirety of this piece, at the exception of the very beginning of it, it held by a single long technic axe. Obviously, large transparent-blue rods to make reactor trails and truncated cones as the reactor bases. The ring is held by rods, too, with an upside down tread — getting them to have a proper circular shape was a complicated journey.
The colourful containers were another fun thing to do : firstly, getting all the right pieces and make the pattern not too regular. And to pretend they’re all connected by nothing, they’re only partially connected, and 'held' by an electromagnetic field figured by the transparent blue pieces on each side of the container rows, which would then be picked by the small container carrier above.
And now, the most important thing : the reason of why I absolutely needed to make this cargo, instead of anything else. It’s quite simple, actually. I needed to get the scale of these containers. Because. Because I had this idea to make a large, large trading spare station with a ring around a large axis, which would be the perfect excuse to make an awful lot of small spaceships. And for that, I needed something for scale, and since it’s a trading station, a container was my best bet. So I have a plan, which I’ll elaborate on probably next week, along a batch of my small ships.
So, uhm. I wanted to post something a bit different here today. Behold a short thing I did a while ago (I'm actually posting it because I found it while cleaning some files). I'll admit, the quality of both the image and whatever I was trying to tell is pretty low. But I think overall, it's still surprisingly decent, for what it's supposed to be.
I did a lot of these some time ago, but it's terribly time-consuming, so I've had to stop. Hopefully, next break, I'll have the occasion to do these again (now with better image quality, and even proper MOCs to use). I miss doing stop-motion a lot-
I sadly don't have much of that project left (images, bits of the background...), though strangely enough, I still have some of the characters. Though I know why the lighting is so bad : at that point, I only had a set of blue lights, which caused this blue filter all over it (it looked really nice, though. Without any camera...)
I won't point out all of the weird details, but I am still quite proud of that odd use of a hair piece as a broom. Some pieces certainly have some unexpected uses.
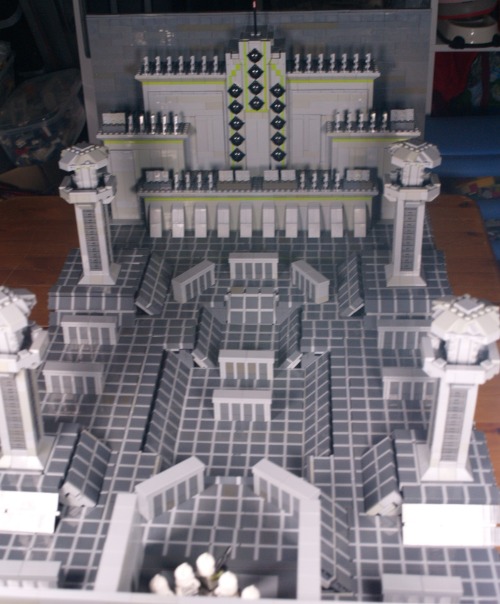
✨Kamino’s citadel challenge !✨
I am…very excited about this one. I’ve had this vision for a long time, and I’m so happy it’s ended up looking like that.
Now, there are a lot of things I’ll go into details along close ups under the cut; the only thing I’ll mention above is that I’m very grateful for TCW’s episode guides’ artworks, without which this would have been quite a hassle.

Okay ! Before diving into all the details and things, here is a view from above, to really display how big it is. Dimension-wise, the plank I built it on is around 110*70cm.

Now of course, the first detail which is noticeable is the floor, because, well, it’s everywhere.

This was probably the most challenging part of the build, because making a grid out of Lego is tough. Most of it is rows and rows of dark square, light lines, separated by 1*n tiles. It was the easiest way to get this pattern with as if it were just tiles; because this is one of the objectives I had here : most of this MOC is smooth, except for a few zones (usually voluntarily).
The fact I used this technic means that the floor in most place isn’t very stable, but it actually holds up pretty well because of some hidden connection points with the foundations underneath, which are mostly hidden under the cover blocks.

Here for instance, I’m using modified 1*2 bricks with a Technic hole : it hold the cover block, and it also attaches the floor to the foundation.
Of course, another problem I ran into were slopes. Much harder to get a smooth effect with the technic I’ve used, so it’s a bit wonky and unstable. Also, most them are not aligned properly, which is visible in the picture above (and some area have some really big misalignments because of a few problems I probably won’t bore anyone reading this with).
Now, since they’re also here, I can deal with the cover blocks. These were, among the details, the hardest to figure out, to get a good size while keeping some texture. Eventually I came up with this design, which, ironically enough, uses the same technic the floor uses, in a different orientation.
Another detail : the miradors :

This is one of the first elements I had in place, because I needed them to get a good sense of scale (and was made better by an existing concept art of a tower alone). Most of it does not have anything noteworthy, except for one illegal technic I used (can you spot it ?)
The pillar holding the roof of the mirador is using a technic I had in my toolbox for a long time, but had never had the occasion to use : if you take two 'brick' bricks and attach them perpendicularly on a snot brick, the small space separating the lines of 'bricks' align to let a 1*n tile in. It’s somewhat reliable (for an illegal technic) and an easy way to get octogonal shapes.
Now, before looking at the Citadel itself, let’s turn around for a minute.

This point of view obviously isn’t the intended one, but it’s still worth noting, if only for some composition.
Notice that the wall here is quite small (smaller than the miradors, even), and light gray; it’s in contrast with the towering dark gray wall on the other side, behind the citadel, which technically should give at least some impressions even to the people who never saw TCW.
Anyway, it’s also on this view that we can see most of my slope struggles, including the central one, which is the biggest I had to do.
And I can’t not mention the most important element :

What would be the challenge without a squad of clones to take it on ? These clones (4 privates and a sergent) are ready to fight ! Well. Kinda. I wish I could have actual cadets, but they are not part of the Lego universe (and the floor was enough of a fee, I can’t afford to get customs figures too). I wish I had the Dominos though. I have TBB Echo, and I plan to get my hands on Fives at some point, but they wouldn’t fit here, sadly, so instead I used some movie accurate clones (because all the others are used for a project I still haven’t posted..maybe later…)
Notably, I at some point tried to get the elevator to work - needless to say it was a disaster (it’s too close to the plate underneath to make something working).
Now, without further ado. The citadel.

I’m very proud of it. I got the proportions just right (I actually made some measurements to make sure of it), and there is just enough texture to not make it bland while leaving it as artificial. This alone took roughly 8-10h (which were all spent during an accidental all nighter, whoops), but it was worth it. It’s completely empty inside, and, in fact, the wall behind it isn’t full as well, anything behind the citadel is opened. The spikes are simple 1*3 angle plates illegally connected, and the walls’ small details were made with a bunch of modified 1*2 plates, there isn’t anything really special in it.
The only really complicated zone was the middle tower, because I had to put all the cannons while keeping it clean and smooth, and including the vertical lime lines. It was a fun challenge. And I included the 'flag' At the top, too, just a red transparent cone on a stick (there’s no need for more), which peeks above the gray wall (for composition and because of a lack of pieces).
Anyway, such a long project deserves one behind the scene photo :

Yes, my desk is messy (and include my mandatory tea cup).
On the left, you can see my remaining floor tiles, which have not been used yet; and just under the citadel, you might notice the foundations visible; it’s a checker of 2*2 tiles which gives my floor a good base to be fixed on. There are also some slopes which haven’t been placed yet (in front of the background miradors), and at this steps, there were no cover blocks or walls yet.
As far as my tools go, you might notice brick separators scattered all around my work environment (I never have enough of those), as well as a tablet in the bottom right hand corner (which i use to check and measure concept arts), and in the middle, the red triangle is an official (albeit old) Lego measurement tool which counts in stud, Lego bar holes and axe length.
Also visible, finally, is the bottom of the foundations, which are stacks of 1*2 bricks (each of the three floor layer is separated by a height of 3 bricks), which means that looking directly under it can lead to watching the dark basement of my build (which isn’t aesthetic…).
Anyway, if you read until here, thanks, I guess ? I still have a few TCW related stuff (a small one next week, some other in the foreseeable feature), so feel free to stick around and maybe leave a note, if you feel like it ? That’s it, bye !

✨Quetza and its pilots !✨
Another combat mech ! And I have more in stock~ (See previous work here)
…and of course closeups and lore under the cut :}
Pilot closeups :


Mech closeups :


Lore !
(All the world’s lore can be found in the first of these posts)
So, this mech is quite impressive, notably because it’s one of the only of the arena featuring four arms ! Quite a complex model to handle, but devastating when mastered. Quetza’s been designed by the two sisters who pilot it.
This, too is unusual, because there’s usually only one pilot — two would require an extreme coordination. But the controls have been modified (you can see the controllers in the hands of the pilot, featuring controls on both sides of the objects, while most controllers only have one). These control the essential of the mech’s basic movements, and require to be very dexterous. The pilot using these is the one considered as the 'true' pilot, contrarily to here sister, who acts as a technic team on her own (hence why only of them wear something cool, and the other plain black clothes). But the so-called technical support is actually completely part of the mech’s piloting, because the holoscreen paired with a lone controller help to automate sword combos and general coordination.
Speaking of the swords, they obviously aren’t made of gold, but a good paint job after each battle can help fix that. This type of weapon caused some problems at the start of Quetza’s career, because without them, the mech was defenceless. This have been fixed with magnetic locks, which hold the swords in place while allowing flexibility.
And next time : …I don’t actually have a name for that one yet, you’ll have to wait-
The swords are also a hassle in real life, because they’re only connected to the hands through a meh illegal technic. You can barely see it on the first image, but they are connected to the back finger using a small claw/tooth, which does the job, but nothing more.
Also, I can’t fathom what set all the plates featuring stickers are coming from, if anyone has a lead, please tell me.
Finally, taking the first picture took me about 15 minutes because there was no angle that could reflect what I actually saw, which was terrible.
Bonus, because you held on until there :
Photo of Quetzal from my former shelf studio, not cropped, and with terrible focus (feel the pain I feel when I realise later that this is a terrible photo~)

-
 obsidiandragongenderwhatgender liked this · 7 months ago
 -
 sad-melted-sapphic liked this · 1 year ago
 -
 maggots-in-the-veins liked this · 1 year ago
 -
 antrylis reblogged this · 1 year ago

They/them - AroaceLego MOCs and photography with a wide range of different characters and environments, every Wednesday (in theory-)
77 posts