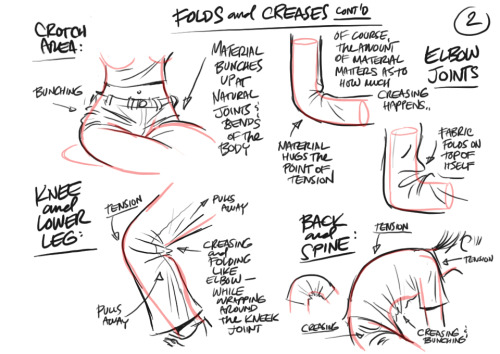
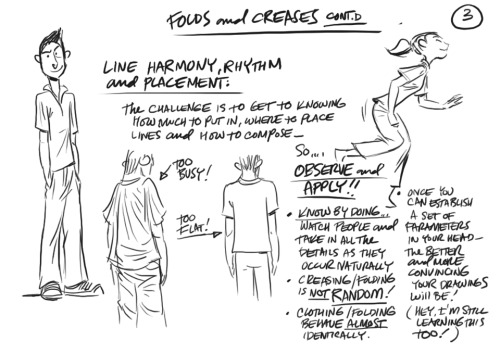
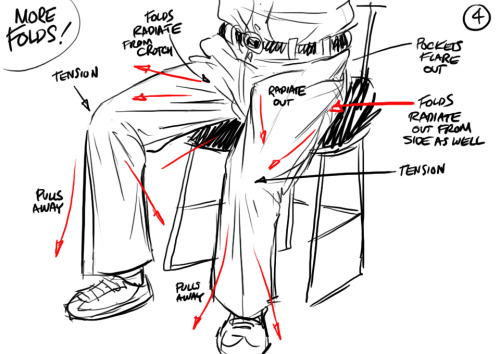
Arms Anatomy.


Arms Anatomy.
More Posts from Artrefforsteph and Others
FireAlpaca is now COMPLETELY a Paint Tool SAI alternative!
BITMAP WATERCOLOR BRUSHES, Y’ALL!!! Want to make some SAI brushes in FireAlpaca? Check out THIS handy Guide!

Want to make this brush? Just make a perfect circle and save it (I call mine “round”) and use it as the bitmap, and copy the settings above. It works pretty nicely :D

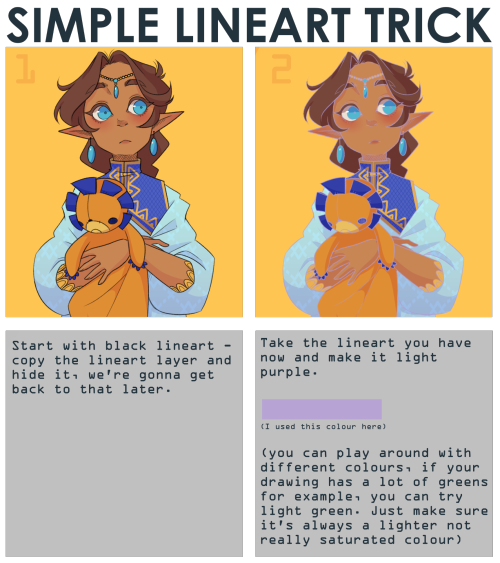
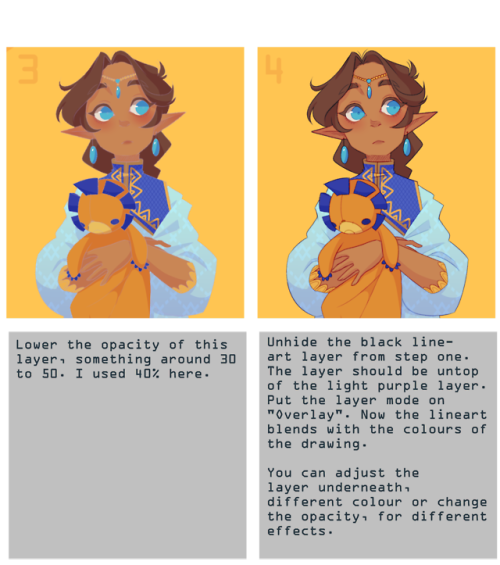
note that it works best with thin lineart (I used SAI2 for this, but I think you can use any art program with a overlay layer mode)
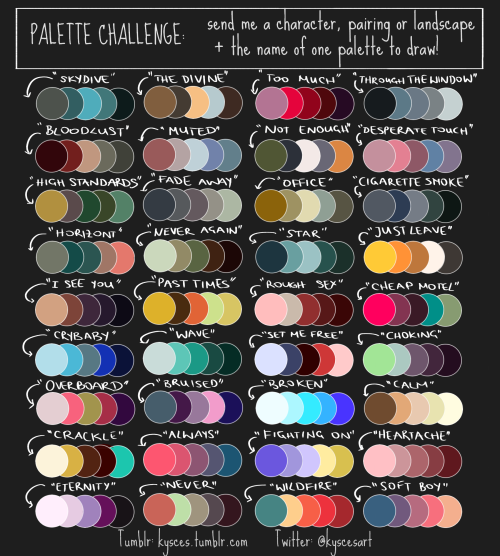
I finally made my own palette challenge! Send me, or the artist who reblogs this, a character, pairing or landscape + the name of one palettte to draw!
Hi! I love your art of various fanlands and i was wondering, would you ever do a tutorial on how you draw them or the process of how you draw them? Or perhaps have any tip or tricks?
sure.
there are certain things/tricks I do almost every time, so here we go.
pick colors for the sky and the ground.

Keep reading
The lip sync tutorial they DON’T give you
I mentioned on twitter that I wanted to do a lip sync tutorial and immediately got some people who were interested so I put one together real quick!
I’m going to use a bit of unfinished lip sync from my taz animated part as reference. They’re just gifs so no sound, but you should still be able to tell that he’s saying “I’d say a solid B… Solid B minus.”
Anyone who’s looked up how to do lip sync has seen phoneme charts. Phonemes are just the shape your mouth makes when you make certain sounds.

When you do lip sync, you want some kind of reference to make sure it’s right
What’s easiest is to say it yourself and pay attention to the shapes your mouth is making. Since you’re going frame by frame, your audio is slow enough that you can make each shape slowly and distinctly and you can get each individual phoneme down in the animation.

Don’t do this.^
An easy way to tell if you’re animating lip sync wrong is if you run out of frames to make each shape. You don’t need them! Making each shape is unnatural. People talk quickly and the mouth doesn’t have the time to get into each shape. They blend together, sometimes to the point where the shape doesn’t change at all!

Not only does the 2nd gif take less frames and energy to make, it’s more relaxed, it looks less distracting, and his lips are much easier to read!
These are reference charts to show the differences more clearly


This is the difference between getting swallowed up in every last detail and paying attention to reality.
What matters more than hitting every syllable is making it look natural and flow with the acting. That’s why anime mouth flaps can work so well. A strong pose through the whole body matters more than one mouth shape.


The getting Started Course is here, go check it out here: http://cgcookie.com/concept/cgc-courses/getting-started-in-digital-art/

i saw a post on my dash with image sites that basically was like “it’s okay to use pictures off pinterest etc. for your edits because it’ll be hard for the original photographer to find and sue you,” which, um, made me a bit annoyed, so here is a list of 100% free stock photo sites, many of which have quite aesthetic-y photos! please do not steal photos in your work, guys!
freeimages
pixabay
pexels
publicdomainarchive
gratisography
picography
stocksnap.io
unsplash
everystockphoto
morguefile
flickr commons
deviantart’s resources section (check creators’ pages for specific terms of use)
Genice, can you give me some advice with hands? The hands i draw sometimes end stiff and ugly. Also hands in perspective, because sometimes they end too big or small. Thanks!
i mostly got better at drawing hands by just practicing how to draw them a lot!what i would do is draw a pose or two over and over again (maybe at slightly different angles and stuff) first with reference, and then draw them again without looking at anything to see how much i can draw from my mind, and then go back and forth between the two until i get enough of a “feel” to draw a certain pose decently without relying on reference. i think after a while you kind of develop patterns in the way you draw hands and from there it becomes easier to draw different hand poses and stuff from scratch
to make the hands you draw look less awkward/stiff, i think it helps to focus more on the overall flow of the composition and silhouette of the hand rather than getting all the details in and anatomy right and stuff in the initial stages


when drawing hands in perspective i think it helps to visualize them as 3d shapes

to get the foreshortening right (aside from using perspective guides and whatnot) i like to just draw the hand first, and then eyeball the perspective and adjust its size and position until it looks right

(select with lasso tool > ctrl+t to transform +right click for more transform options)

another thing i do is take reference pictures with my ipod (any camera works tbh. i just find using a mobile device to be more convenient)by holding the camera close to my hand i can get a really exaggerated perspective like this:

it’s nice because i can get the ref for the exact pose and angle i’m looking for without having to do a lot of internet fishing

-
 artsie-fartsie-smartsie reblogged this · 2 years ago
 -
 elrazy liked this · 3 years ago
 -
 awinchester97 liked this · 6 years ago
 -
 oblivionartreferences reblogged this · 6 years ago
 -
 faelicy liked this · 6 years ago
 -
 reamina liked this · 6 years ago
 -
 clessiy liked this · 6 years ago
 -
 ania135246 liked this · 6 years ago
 -
 mis-kitty liked this · 6 years ago
 -
 typeq809 liked this · 6 years ago
 -
 hordefuzzball liked this · 6 years ago
 -
 wutwasthtsound-idkmyheartbreakin liked this · 6 years ago
 -
 foulskeletonllamadean liked this · 6 years ago
 -
 ederedyy liked this · 6 years ago
 -
 spxctrx liked this · 6 years ago
 -
 justidling reblogged this · 6 years ago
 -
 kamenriderhyrule liked this · 6 years ago
 -
 elegantbanditclodherring liked this · 6 years ago
 -
abeholdertobeauty reblogged this · 6 years ago
-
 sylphofdoom8 liked this · 6 years ago
 -
karydra liked this · 6 years ago
-
 eggegggegegege reblogged this · 6 years ago
 -
 yagistars liked this · 6 years ago
 -
 trans-autistic-peter-parker reblogged this · 6 years ago
 -
 skeevyken reblogged this · 6 years ago
 -
 kazikli-bae liked this · 6 years ago
 -
 mycollectionofresourcesandstuff reblogged this · 6 years ago
 -
 whitestar18 liked this · 6 years ago
 -
 kkat-art reblogged this · 6 years ago
 -
cr45h-n-8urn liked this · 6 years ago
-
 susannahsteiner liked this · 6 years ago
 -
mufmufsoftencookiemuffinchesse reblogged this · 7 years ago
-
mufmufsoftencookiemuffinchesse liked this · 7 years ago
-
 zodiblogger-blog liked this · 7 years ago
 -
 karamell-reblogs reblogged this · 7 years ago
 -
 deadkim-blog liked this · 7 years ago
 -
 furiousmangacutehuman-blog liked this · 7 years ago
 -
 seraphria liked this · 7 years ago
NSFW because there will probably be nude refs | this is a side blog to sort all of the art stuff I need | none of it is mine
151 posts